To be automatically notified when there are new postings to the blog please enter your email address below:

Sunday, December 30, 2012

Free Online Courses from BYU Continuing Education

 http://is.byu.edu/site/courses/free.cfm

About Our Free Online Courses

Our free online courses offer a variety of classes from self-improvement, to academic subjects. While free courses are not for credit, they’re a great way to learn something new at no cost to you! So whether you’re looking to better understand personal finance, learn how to build your family tree, or just try out our site before enrolling, our free courses are a valuable resource.

Recommended Free Courses


Family History / Genealogy — Introductory

FHGEN 070 — Introduction to Family History Research
FHGEN 075 — Writing Family History
FHGEN 080 — Helping Children Love Your Family History

Family History / Genealogy — Record Type

FHREC 071 — Family Records
FHREC 073 — Vital Records
FHREC 076 — Military Records

Family History / Genealogy — Regional and Ethnic

FHFRA 071 — French Research
FHGER 071 — Germany Research
FHHUG 071 — Huguenot Research
FHSCA 073 — Scandinavia Research

Family Life

FAMLF 071 — Strengthening Marriage and Family: Proclamation Principles and Scholarship
FAMLF 072 — Free! Building A Functional Family: Essential Elements
FAMLF 075 — Dating: Romance And Reason

Family Life — Parenting

PARNT 074 — Rearing Responsible and Righteous Teens in a Wicked World
PARNT 075 — Developing Self-Reliant People

Gardening

GARD 071 — Planning And Preparing Your Garden
GARD 072 — Growing Vegetables, Fruits, And Nuts

History and Government

CIT 070 — The Citizen's Guide to American Politics

Mathematics

MATH 071 — Basic Arithmetic, Part 1
MATH 072 — Basic Arithmetic, Part 2
MATH 073 — Basic Arithmetic, Part 3
MATH 074 — Basic Arithmetic, Part 4

Music

MUSIC 071 — Organ Performance, Level 1
MUSIC 072 — Organ Performance, Level 2

Personal and Family Finance

PFIN 070 — Marriott School of Management: Personal Finance
PFIN 075 — Student Finance

Personal Development

ESL 071 — English as a Second Language--Chinese Speakers
ESL 072 — Basic English for Spanish Speakers
PDEV 075 — Self-Discipline
PDEV 076 — Honesty
PDEV 077 — Trust
PDEV 080 — Study Skills

Recreation

REC 076 — Bowling
REC 077 — Intermediate Swimming

Religion - LDS Temples

TMPLS 071 — Temples Past and Present

Religion - Missionary Preparation - Youth

MISS 071 — Preparing to Serve the Lord

Religion - Teachings of the Living Prophets

PROPH 071 — The Living Prophets

Religion - The Book of Mormon

BM 071 — 1 Nephi 1 through Alma 30
BM 072 — Alma 30 through Moroni

Religion - The Doctrine and Covenants

DC 071 — Sections 1 through 87
DC 072 — Sections 88 through Official Declaration 2

Religion - The Joseph Smith Translation

JST 071 — The Jospeh Smith Translation of the Bible, Part 1

Religion - The New Testament

NT 071 — The New Testament
NT 072 — The New Testament
NT 080 — The Writings of John: The Gospel

Religion - The Old Testament

OT 071 — Genesis 1-50

Spelling

SPELL 071 — Contractions, Capitalization, and 'ei/ie' Words
SPELL 072 — Word Endings And Plurals
SPELL 073 — Word Pairs

Monday, December 24, 2012

Healthy Holiday Feasting

 http://www.hashworks.com/foodstorage. 
 
Holidays are hectic. Between presents, decorating, crafts, holiday performances, entertaining, and snacking on all kinds of treats, it's no wonder we're tired -- and no coincidence that everyone's getting sick in January and February. But it doesn't have to be this way. Here are quick tips and good recipes for healthy holiday feasting. They'll help you save time and money. They'll also help you avoid the cycle of being tired during the holidays and sick afterwards. And many of them use traditional food storage foods.

Don't think of cutting out -- think of adding in!

If you think in terms of not eating holiday treats, you set yourself up for a struggle right when temptation is greatest. Instead of thinking in terms of cutting out treats and traditional holiday foods, think of adding in lots of good, healthy food. Then go ahead and have some goodies without feeling guilty. Concentrate on eating well, with a focus on eating these things:
  • Foods that are high in fiber
  • Lots of fresh vegetables and fruits (5-8 servings a day)
  • Whole-grain cereals, breads, muffins

Make it convenient to eat good food

With tempting goodies so readily available, you have to make it convenient to eat healthy food. This isn't as hard as it may seem at first. First commit to do it, then prepare in advance:
  • Include at least one fruit and one vegetable with every meal, and snack on fruits and vegetables during the day.
  • Prepare fruits and vegetables in advance so they're easy to snack on (peel and section oranges, cut melons up into chunks, wash grapes and take them off the stems, peel and cut up carrots or get baby carrots).
  • To encourage nibbling, put fruits and vegetables where you can see them in the fridge; set a bowl of them out where they're easy to snack on.
  • If you're going to be baking sweets, set out a bowl of finger fruits/veggies right where you're working. Then, when you're tempted to dig into the dough or the batter, eat the fruits or vegetables instead.
  • For easy whole-grain cereals, put whole or cracked grains in the crockpot the night before and cook overnight on low. Then the cereal is ready in the morning; all you have to do is dish it out. Cereals like oatmeal and germade only take a few minutes to cook in the microwave. Put them on before you step into the shower, and they'll be ready when you get out.
  • Bake big batches of whole wheat bread, muffins, pancakes, waffles, etc. Then freeze and take out as needed.
  • When you bake goodies, try to put sneak in fiber by using ingredients such as whole wheat flour, rolled oats, and all kinds of nuts. That way, you can get away with some sugar, candy, etc.

Simplify

Holidays are fun, but busy. Here are ideas for simplifying:
Plan quick meals. For everyday meals, plan things that take 30 minutes or less to prepare. The key to doing this is to plan ahead, stock your house with things your family likes and will eat, and make meal plans so you can combine tasks.
Do the day's cooking all at once. Instead of fixing breakfast, lunch, and dinner at different times during the day, do everything at once: Cook the breakfast cereal or whatever, make lunch sandwiches, and start a dinner stew in the crockpot, all at the same time. Then you only have to clean up the kitchen once. Plus, you enjoy the peace of mind that comes from knowing dinner will be ready at the end of a busy day.
Do a bunch at once. Make enough salad to last three days, then store a day's worth in a ziploc bag to keep it crisp and fresh. Prepare fruits and vegetables for snacking this way, too. When you bake, double or triple the batch, then freeze the extras.

Festive Fresh Fruit Salad

Cut up any fresh fruit you wish -- such as apples, oranges, bananas, kiwi, pineapple, grapes. Stir in a cup of lemon yogurt, then sprinkle coconut on top. To make it "Christmas-y," slice kiwis and place on top, along with a sprinkling of dried cranberries. This is really easy and pretty, perfect for entertaining.

Easy, Nutritious Suppers

For easy nutritious suppers, follow this formula:
1) Fix a soup in the crockpot (start it in the morning - try beef stew with stew meat, barley, potatoes, onions, carrots; chicken soup with chicken, onions, carrots, potatoes; chili with canned tomatoes, pre-fried hamburger, and kidney beans, seasoned with chili powder; broccoli soup; potato soup; clam chowder, etc.)
2) Have a fresh salad (prepare 3 days' worth at once, as explained earlier)
3) Have a slice of good whole-wheat bread
4) If you wish, have a whole-grain cookie or some whole-grain cake
Vegetable Bags for Easy Soup
Preparing and freezing "vegetable bags" ahead of time makes it easy to fix a quick batch of crockpot soup. In the morning, just throw in the vegetable bag, water, meat, and seasonings. Cook on low all day, and it's ready for dinner when you are.
To prepare vegetable bags, buy carrots, onions, and celery in quantity (2 lbs carrots, 6 onions, and a large bunch of celery make 4-6 vegetable bags). Run the carrots through the food processor, and chop the celery and onions.
Then combine 1 cup of each vegetable in ziploc bags (3 cups total) and freeze. This is a good basic combination that lends itself to lots of variations. When you make your soup, you can add anything else you want -- potatoes, rice, noodles, canned peas, corn, beans, and so on.

Tuesday, December 18, 2012

Basic & Expanded Food Storage

  http://www.hashworks.com/foodstorage.htm#Aug%201997:Basic%20and%20Expanded%20Food%20Storage Putting together a year's supply of food can be a daunting task! How do you do it? A step at a time:
1. Acquire and begin using basic food storage.
2. Decide what you'd like in your expanded food storage.
3. Gradually these items as they go on sale, then store, and use.
Basic Food Storage
Basic food storage should include life-sustaining food for a year. It might not be gourmet, but it would keep you alive! Basic food storage requirements for an average adult for one year are as follows.
Grains (wheat, rice, corn, etc.) 400 lbs
Nonfat dry milk 16 lbs
Sugar/honey 60 lbs
Salt 5 lbs
Fat/oil 20 lbs
Dried legumes 60 lbs
Water 2 wks supply
(Taken from Essentials of Home Production & Storage, published by the Church of Jesus Christ of Latter-Day Saints.)
Expanded Food Storage
In addition to the basic food storage listed in the table above, most of us would like to have some of the things we use everyday -- meats, cheeses, vegetables, seasonings, and so on -- on hand.
Here's a simple way to gradually acquire expanded food storage:
1. Keep a list handy in the kitchen. As you cook day to day, note what you use that you'd like to keep on hand.
2. Watch the sale flyers that come with the newspaper on Sundays and Tuesdays. Note the prices for things you use all the time. When there's a good sale on an item, buy in bulk -- enough for 3 months, 6 months, or 1 year, depending on how perishable the item is and what you can afford.
Buying on sale this way, you can get almost everything at ½ to 1/3 off the usual retail price. The savings allow you to build up expanded food storage at very little extra cost.
Cookbook Review: Too Busy to Cook
Emergencies that might force us to live on wheat and beans for an extended period of time are rare. But "everyday emergencies," when life gets super busy, are common. Wouldn't we all like to have lots of pre-cooked meals on hand as everyday-emergency food storage? (How about a month of meals on hand before a wedding, new baby, or missionary homecoming? Or at the beginning of December -- no cooking during the Christmas rush!)
Too Busy to Cook explains a basic method for cooking about a month's worth of meals at a time, which you then freeze so they're at your fingertips. These are the basic steps:
1. Choose 10 entrees you'd like to serve in the next month or so.
2. Make a grocery list of all the ingredients, then shop for what you need.
2. Prepare individual ingredients all at once (cook meat, grate cheese, chop vegetables).
4. Assemble the meals and freeze.
There's a set of 10 recipes with a shopping list and detailed instructions to get you started. The book also includes another set of 10 recipes with less-detailed instructions; reference tables; ideas for cutting back on fat and eating healthier; and a recipe section with about 40 recipes.
Too Busy to Cook (9.63 at Seagull books)
Lori L. Rogers & Chriscilla M. Thornock
Published 1994, 100 pages, softback
Everyday-Emergency Meal: Super Easy Fried Chicken
1 pkg croutons
4-6 boneless, skinless chicken breasts
2-3 T butter
Rinse chicken breasts. Grind croutons to fine crumbs in blender. Put in large plastic bag with 2 chicken breasts; shake to coat. Repeat til all are done. Spray large fry pan with non-stick cooking spray & melt the butter. Put the chicken in & cook for 15 minutes each side. This recipe is also good with chicken tenders, for finger food.
Food Storage Recipes: Cool Summer Salads
3-Bean Salad (Georgianne Dalzen)
Dressing:
1. In blender, mix:
  • ½ - 1 C sugar 1 tsp salt
  • 1 tsp paprika 1 T worchestershire
  • ½ tsp dry mustard 1 T onion, chopped fine
2. Then gradually add
  • 1 C salad oil
  • 1 C cider vinegar
3. Last, add
  • ½ C toasted sesame seeds (Toast in oven 10-15 min at 300)
Serve over rice or beans. May add your choice of green beans, raisins, peanuts, bell pepper, jicima, shredded carrots, onions, garbanzo beans, kidney beans.
Aztec Salad (Georgianne Dalzen)
Dressing
  • 2 T seasoned rice vinegar
  • juice of one lime
  • 2 garlic cloves, minced
  • 2 tsp cumin
  • 1 tsp coriander
  • ½ tsp crushed red pepper (optional)
  • ½ tsp salt
Salad
  • 2 cans black beans
  • 2 C frozen corn
  • 2 large tomatoes
  • 1 large green pepper
  • 1 red or yellow pepper
  • 1 red onion, chopped
  • 3/4 C chopped cilantro
Chicken Salad (Serves 20+)
1. Mix 2 T oil, 2 T orange juice concentrate, 2 T vinegar, and 1 tsp salt.
2. Pour above mixture over 5 C cooked, cubed chicken (6-8 breasts). Marinate overnight.
3. Next day, add 3 C cold cooked rice, 1 13-oz can pinepple tidbits, drained, 1 can mandarin oranges, 1½ C chopped celery.
4. Mix together 1 C mayonaise & 1 C Miracle Whip, then add to chicken mixture.

Tuesday, December 11, 2012

Oatmeal

 http://www.hashworks.com/foodstorage.htm
Oatmeal
Oatmeal is one of the healthiest foods around. It's rich in soluble fiber, and has been proven to help lower cholesterol. It's also inexpensive and keeps well, making it a good choice for long-term food storage.
Instant vs. Regular. Instant oatmeal is just regular oatmeal that's been broken up so it will cook faster. All grains store better and longer if they're kept intact, so regular oatmeal is best for food storage. If you want instant oatmeal, just put regular oatmeal in the blender and pulse it a few times.
Where to buy. You can buy oatmeal in small quantities at the grocery store, but it's much less expensive to buy in bulk. 
What do you do with it? What do you do with 50 pounds of oatmeal besides eat mush every morning? All kinds of things.
  • Oatmeal itself is a very versatile baking ingredient. Use it in
  • * Granola
  • * Cookies
  • * Muffins
  • * Crisps and cobblers
  • * Meatballs and meatloaf
You can also make oat flour by grinding regular oatmeal in the blender (just pulse until it's very fine). Oat flour can be substituted for part of the regular flour in almost any recipe. Oat flour has all the health benefits of regular oatmeal. Plus, it's an ideal ingredient for low-sugar, low-fat treats. Because it's slightly sweet, you can cut back on sugar in a recipe. And because oat flour holds moisture, you can cut back on the fat in a recipe.

Oatmeal Recipes

Classic Oatmeal Cookies
(Abt 60 2-inch cookies)

oven 375 bake for 10-12 minutes

1 C butter/margerine
½ C sugar
½ C brown sugar
1 egg
1 teaspoon vanilla


Cream til fluffy.


1 ½ C flour
1 tsp baking soda
½ tsp salt
1 tsp cinnamon


Stir together, then add to creamed mixture.

3 C oatmeal
6 oz (1/2 bag) choc chips
1 C chopped walnuts

Fold in.
Drop by rounded tablespoons on ungreased cookie sheet, bake 10-12 minutes.
* To reduce the fat, cut butter to ½ C butter and add ½ C applesauce.


Non-fat, Low-sugar Banana Muffins oven 350 15 minutes

1½ C whole wheat flour
1/3 C brown sugar
1 T baking powder
½ C oatmeal flour
1/4 C oatmeal


Sift together.

1 C mashed, very ripe bananas (abt 2 large)
1/3 C milk/ buttermilk
1 tsp vanilla
2 egg whites
Combine, then stir into dry ingredients just until moistened. Bake in muffin cups coated with non-stick spray.


Berry Cobbler Topping (This recipe is taken from Fat-free Holiday Recipes, by Sandra Woodruff) oven 375 45 minutes
A sweet biscuit-type topping for any kind of berry cobbler (blueberry, raspberry, etc.)

1/3 C oat flour
2/3 C flour
1/4 C sugar
1 ½ tsp baking powder


Stir together.


½ C buttermilk

Add and stir just till moistened.
Spoon on top of berry mixture and cook for 45 minutes, or til browned.
* To make a simple, low-sugar berry cobbler: combine 6 C berries, 3 T cornstarch, and 1/3 C sugar.
Oatmeal for One
In large serving bowl, combine 1/3 C oatmeal & 1 C water. Microwave for 3-4 minutes.
Muffins for One or Two (Fast, easy breakfasts)
Bake any muffin recipe as usual, then freeze. Individual muffins microwave in about 45 seconds, for great snacks or very fast breakfasts.
Easy Meatballs
(Abt 60 1" meatballs)
oven 350 25 minutes

1½ lbs lean hamburger
3/4 C oatmeal
(*Can pulse into oat flour)
1 egg or 2 egg whites
½ C onion, fine dice
1½ C beef bouillon
½ tsp pepper

Mix thoroughly. Shape into 1" balls. Coat cookie sheet with nonstick spray, and bake meatballs for 25 minutes.
Fast, easy meals:
Bake recipe in bulk, then freeze meatballs in meal-sized portions. Microwave & serve with frozen/canned veggies for a fast, easy meal.
Eat all different ways:

* Spaghetti sauce, meatballs, spaghetti
* Sweet and sour, meatballs, rice
* Cream of mushroom soup, meatballs, noodles
Families on the go:
* Combine meatballs and sauce in crockpot at beginning of the day. Dinner's ready when you are; plus, family members can serve themselves as they come and go.
For one or two:
* Make individual mini-meatloafs in muffin tins. Freeze in meal-sized portions.
* Cook meatballs in bulk, but freeze small portions in ziploc bags.
* Use the crockpot idea above, but use a "crockette" (very small crockpot, about the size of potpourri steamers).

Tuesday, December 4, 2012

Are You READY?

Are You Ready? provides a step-by-step approach to disaster preparedness by walking the reader through how to get informed about local emergency plans, how to identify hazards that affect their local area and how to develop and maintain an emergency communications plan and disaster supplies kit. Other topics covered include evacuation, emergency public shelters, animals in disaster and information specific to people with access and functional needs.
Are You Ready? also provides in-depth information on specific hazards including what to do before, during and after each hazard type. The following hazards are covered: Floods, Tornadoes, Hurricanes, Thunderstorms and Lightning, Winter Storms and Extreme Cold, Extreme Heat, Earthquakes, Volcanoes, Landslide and Debris Flows (Mudslide), Tsunamis, Fires, Wildfires, Hazardous Materials Incidents, Household Chemical Emergencies, Nuclear Power Plant and Terrorism (including Explosion, Biological, Chemical, Nuclear and Radiological hazards).
Are You Ready? is also available in Spanish, and can be used in a variety of ways including as a read-through or reference guide. The guide can also be used as a study manual guide with credit awarded for successful completion and a 75 percent score on a final exam. Questions about the exam should be directed to the FEMA Independent Study Program by calling 1-800-238-3358 or by going to training.fema.gov/is.
Also available is the Are You Ready? Facilitator Guide (IS-22FG). The Facilitator Guide is a tool for those interested in delivering Are You Ready? content in a small group or classroom setting. The Facilitator Guide is an easy to use manual that has instruction modules for adults, older children and younger children. A resource CD is packaged with the Facilitator Guide that contains customizable presentation materials, sample training plans and other disaster preparedness education resources.
Copies of Are You Ready? and the Facilitator Guide are available through the FEMA publications warehouse (1.800.480.2520). For large quantities, your organization may reprint the publication. Please visit our reprint page for more information.
For more publications on disaster preparedness, visit the Community and Family Preparedness webpage.
Are You Ready? An In-depth Guide to Citizen Preparedness Full Document (PDF - 21Mb)

http://www.ready.gov/are-you-ready-guide

Friday, October 26, 2012

Growing Grains

http://sevenyearsofplenty.blogspot.com

From Seven Years of Plenty Blog
Wheat and other grains are essential to our basic food storage. In 1876 Brigham Young instructed the women to gather wheat and store it against a day of possible need. President Hinckley reflects upon this instruction, "Through the years hunger was alleviated because of this program. It reached its culmination in 1918 when the Relief Society wheat was sold to the United States government and used to alleviate starvation that had resulted from the scourge of the First World War. The money gained was reinvested."
“Ambitious to Do Good”", Ensign, Mar. 1992, 2

Sheri Dew also talks about the Relief Society storing wheat and helping those in need. She said, "Wheat, which had been stored since 1876, was sent to survivors of the 1906 San Francisco earthquake and to World War I victims (the Relief Society sold 200,000 bushels to the U.S. government). During this period the Relief Society adopted the motto “Charity Never Faileth.”
 "“Something Extraordinary”", Ensign, Mar. 1992, 51

What great examples these early Relief Society sisters were to following the counsel they had been given. They also got to see the benefit of following that counsel. Aside from only storing wheat, this year I am going to try to grow some grains. It is very inexpensive, low-maintaince, and it is beautiful grass.

The best grains for home gardening are wheat, corn, oats, barley, buckwheat, millet, rye, and amaranth. Grains are simple to grow, as many grasses are. The book, “Homegrown Whole Grains: Grow, Harvest, and Cook Wheat, Barley, Oats, Rice, Corn, and More" is a great resource. There was an article about this book in the Richmond times a few weeks ago.

Oats - Germinates quickly but difficult to harvest unless you go with hull-less variety

Rye - Easy to harvest, very hardy. Has no hull.

Wheat - Easy to manage in gardens. Very common ingredient.

Buckwheat - Broadleaf plant with a strong flavor that often is milled into flour for pancakes.

Corn - One of the easiest crops to grow. It can be eaten fresh, ground into cornmeal or popped into popcorn.

Millet -Tasty when served like rice or added to foods for it’s crunch. Loaded with protein, B vitamins and minerals.


Amaranth - Tall, broadleaf plant that forms feathery plumes. The leaves can be cooked and eaten like spinach. Grains have a peppery taste and are rich in protein and other nutrients.

Tuesday, October 16, 2012

Roasting Squash and Pumpkin Seeds

How to Roast Squash and Pumpkin Seeds

October/November 2011
http://www.motherearthnews.com/real-food/roast-pumpkin-seeds-zmrz11zalt.aspx By Tabitha Alterman
Savory Winter Squash
For a super snack, roast the seeds from your pumpkins and winter squash.
PHOTO: TIM NAUMAN/WWW.TIMNAUMAN.COM
Pumpkin and squash seeds are loaded with protein and fiber, and they make a great energy-boosting snack or crunchy addition to many meals. Save these delicious and nutritious seeds from ending up in the compost heap in five easy steps.
Step 1: Soak
Scoop out the seed mass of the squash or pumpkin, and rinse the seeds in a strainer under running water. Don’t worry about getting all of the pulp off, because soaking them for a while will make it easier to rub the pulp off later. Allow the seeds to soak in a bowl of brine (half a teaspoon of kosher salt per cup of water) for a few hours.
Step 2: Rinse and Dry
Rinse the seeds in a strainer again, rubbing them between your fingers to loosen any remaining pulp. Scatter the seeds on a clean towel to dry for a few hours, or until they are dry to the touch.
Step 3: Season
Use whatever sounds yummy. Sweet and savory both work — be creative. First, toss the seeds with a little honey or oil to add flavor and help your seasonings stick. Try these tasty combos:
Sweet: honey, cinnamon, sugar
Spicy: olive oil, cayenne pepper, smoked paprika, salt, pepper
Zingy: peanut oil, soy sauce, crumbled seaweed, ground ginger, spicy red chili sauce
Addictive: melted butter, thin slices of garlic, coarse sea salt
Step 4: Roast
Place the seeds in a baking dish and roast at 300 degrees Fahrenheit for about 10 to 15 minutes, tossing them around once or twice. They’ll be done when they’re golden, and they’ll become crunchier as they cool.
Step 5: Eat Up!
Try sweet seeds as a topping on yogurt or applesauce, and savory seeds on soups and salads. When eating the roasted seeds as a snack, you can bite off the pointed tip to crack the shell and enjoy the tasty inner seed meat.

Monday, October 8, 2012

Everyday Home Storage


Ensign/2012/03/everyday-home-storage

Tuesday, October 2, 2012

Cooking With Pumpkin: a Creative Challenge


September/October 1973
http://www.motherearthnews.com/real-food/cooking-with-pumpkin-zmaz73sozraw.aspx By Barbara Bambinger
023-048-01-The-Pumpkin
Though their vines are prolific, cooking with pumpkin can be a challenge.
PHOTO: MOTHER EARTH NEWS STAFF
We may well have had the smallest pumpkin patch in Quebec last fall ... but even so, its productivity overwhelmed us. We'd never grown the crop before and hadn't expected the vines to proliferate so generously.
We were pleased with our success but at the same time in a quandary as to what could be done with our healthy harvest. How were two stomachs going to dispose of 21 "symbols of harvest" before the first frost? Making one jack-o'-lantern and giving three pumpkins to each of our two neighbors still left us with 14 offspring ... not enough to set up a stall in the market, but far too many to convert into pies.
To the rescue (for the thousand-and-first time) our French neighbor! ... who informed us that in the old country pumpkins are used to create delicate soufflés, hearty soups, intriguing main or side dishes, and an endless variety of desserts. Sure enough. With just a little effort, we soon found more pumpkin recipes from all over the world than we were able to try with only 14 of the delicious gourds.
Cooking with pumpkin is as rich in its challenge to creative cooks as pumpkin pulp is rich in vitamin A. Being rather bland, the pulp lends itself beautifully to stuffings, spice mixtures, and imaginative combinations. One pound serves two people generously.
To steam pumpkin, clean and peel the fruit and cut it into small pieces. Cook the chunks in a covered pan, along with a small amount of water, until they're tender ... 25-35 minutes. Serve the dish with butter and a dash of nutmeg, or mashed in place of potatoes.
To bake one of the gourds, slice it in half or cut a lid from its top, and clean out the inner seeds and pulp. Brush the inside with butter and sprinkle it with brown sugar or pumpkin spices. Set the golden globe in a 350° oven until it's tender ... about an hour if the fruit is whole, less if it's cut in small pieces.
Pumpkins can be used interchangeably in recipes which call for winter squash. Here are just a few of the many other possible ways to prepare this truly international comestible (all recipes serve six):

Sopa De Abobora

(Brazil)
Puree 1 1/2 cups of cooked pumpkin, place the pulp in the top of a double boiler and add:

  3 cups bouillon
  1/4 cup minced green pepper
  1/4 cup minced onion
  1 tsp. basil or chervil
  dash of nutmeg
  salt and pepper to taste

Heat the mixture over water until it boils. Combine and add:

  1 -1 /2 cups heavy cream
  3 egg yolks

Cook and stir the dish briefly until the desired thickness is reached. Serve it hot with croutons or fresh parsley garnish.

Jack-On-The-Table

Cut a lid from the top of a pumpkin and remove the seeds and strings as you would for a jack-o'-lantern. Brush the inside of the cavity with butter, replace the cover and bake the gourd at 350° for 40 minutes.

Baste the inside of the pumpkin with one-half of this warm mixture:

  1/4 cup melted butter or margarine
  1/4 cup honey
  1/4 cup apple juice
  1/2 tsp. fresh-ground nutmeg

Bake the "Jack" 40 minutes more, or until it's tender. Then place the pumpkin on the table and scoop out servings from the inside or cut the wall into wedges. Top each portion with some of the remaining warm butter mixture.

Calabaza con Arroz

(pumpkin with rice)
  2 cups cooked pumpkin (mashed)
  1 1/4 cups cooked rice
  1 cup plain yogurt or sour cream
  1/4 cup butter or rnargarine
  2 Tbs. honey
  1 tsp. salt

Cook and stir these ingredients over low heat for 8 to 10 minutes.

Tumpa meo Protein

(Swedish pumpkin with protein)
Preheat the oven to 450°. Grease a baking dish and sprinkle it with fine
crumbs.
Combine:
  2 cups cooked pumpkin (mashed)
  2 cups cottage cheese
  2/3 cup honey
  2 eggs, slightly beaten
  1 tsp. cardamon
  1/2 tsp. each of clove, mace and ginger

Put these ingredients in the prepared dish and bake them 10 minutes. Reduce the heat to 325° and cook the pumpkin 40 to 50 minutes longer until a knife inserted into the middle comes out clean.

Pickled Pumpkin

Peel and cut into one-inch cubes:
  4 cups pumpkin pieces
Bring to a boil:
  1 cup sugar
  3/4 cup white vinegar
  1/4 cup dark corn syrup
  1/2 cinnamon stick, crushed
  6 whole cloves
  2 tsp. fresh-grated ginger

Add the pumpkin and cook the mixture slowly until it's tender ... about 45
minutes. Pour the pickle into a quart Mason jar, covet it tightly and
refrigerate the mixture.

Halloween Ice Cream

Cook and stir over gentle heat until well blended and hot but not boiling:
  1/2 cup milk
  1/4 cup honey
Combine:
  1 cup cooked pumpkin (mashed)
  1/4 tsp. each of cinnamon, ginger, nutmeg and salt

Stir the milk and honey into the pumpkin and chill the mixture. Fold in:
  1 cup heavy cream, whipped

Freeze the ice cream until it's solid.

Kabak Tatlisi

(Turkish Pumpkin Dessert)
Peel, clean and cube a small pumpkin. Sprinkle it with 1 1/2 cups of brown
sugar ( or honey) and steam it gently in a small amount of water. Garnish the
dessert with a scoop of plain yogurt and chopped or ground walnuts.

Wednesday, September 19, 2012

Make a Blanket Rack - from Mother Earth News

Mother's Blanket Rack

March/April 1980
http://www.motherearthnews.com/do-it-yourself/blanket-rack-zmaz80mazraw.aspx By the MOTHER EARTH NEWS editors
062 blanket rack
This blanket rack uses a diamond-and-a-half pattern, but the size and shape of the bottom scroll work and upper cutout are arbitrary.
PHOTO: MOTHER EARTH NEWS STAFF
Storage space for blankets—during the "in between" months when it can be cold one night and warm the next—can sometimes be hard to come by . . . especially when the shelves of many folks' bedroom closets are overflowing with the young'uns' toys, last season's clothing, or assorted containers that are "sure to come in handy someday".
Fortunately, MOTHER EARTH NEWS' researchers have designed a blanket rack that provides an easy solution to the problem . . . and one that won't crush the down in your comforter or crease the fabric of your favorite bed coverings. Better still, the holder's wooden rods can also be used for drying clothes, hanging towels (when you find yourself besieged by a lot of guests), or racking shoes (they rest against the bottom crossbars).
The attractive piece of furniture can be yours to enjoy . . . for only a few dollars' worth of wood and a couple of hours of your time. And this is one project you just about have to build yourself, because it's not the kind of item you'll find in the local department store at any cost.
MOTHER EARTH NEWS' workers built the handy device from spruce, but you can get almost the same results using white pine or fir. We cut a pair of 32" lengths of 1 x 12 for the rack's ends, and ripped five 1 1/4" x 1 1/4" boards from a 20" length of 2 x 8. (You could also use your ripsaw to divide three 20" 2 x 4's . . . which would leave you with one extra rod.) Our materials list was filled out with ten No. 12 x 1 1/2" flathead screws, ten 1/2" wooden cap buttons, and some glue and varnish.
As for tools, you'll need a ripsaw, a crosscut saw, a saber saw, a hand drill with a No. 12 adjustable countersink bit, a screwdriver, a paintbrush, and some sandpaper.
After cutting the 1 x 12's to length, you can determine the shape you'd like and cut both pieces with a saber saw . . . or you could, if you prefer, simply assemble the rack with unadorned rectangular sides. We decided on a diamond-and-a-half pattern.
The best way to come up with a pleasing end pattern that's symmetrical is to make a template by folding a sheet of wrapping paper—11" wide and 32" long—in half lengthwise. Draw one edge of your proposed end board ... cut both edges of the folded paper . . . open it up . . . and if you like the result (assuming the removal of the wood will leave room for attaching the five crossbars), trace the lines on one of the 1 x 12's and then cut the two of them at once.
We elected to place the centers of the two lower rods four inches above the floor line and six inches apart. The ends of the three upper pieces form the points of equilateral triangles with five-inch sides . . . the highest points being two inches below the end pieces' top edges.
We marked the two 1 x 12's and, using a No. 12 adjustable countersink tool, bored the holes for the crossbars. This drill/countersink tool not only creates the right-sized hole, but sinks it 3/16" . . . which is the depth you'll need later to install the 1/2" cap buttons.
Then we glued and secured — with No. 12 x 1 1/2" flathead screws — the ends of the rods to the inner faces of the two 1 x 12's. Note that the 1 1/4" faces of the lower crossmembers are parallel to the floor, while the three upper pieces are cocked 45° in an "edge high" position.
Next, we glued in the cap buttons and sanded all edges and surfaces. A couple of coats of satin urethane varnish (lightly sanded between applications) and voila: Our blanket rack was complete.
We think it's not only useful, but unusual enough to make an excellent gift.

Wednesday, September 5, 2012

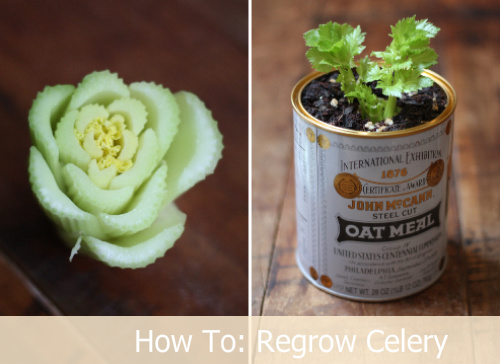
Growing Celery Indoors - from 17 Apart


Growing Celery Indoors: Never Buy Celery Again


Remember when we tested and shared how to grow onions indefinitely last week? Well, at the same time, we've been testing out another little indoor gardening project first gleaned from Pinterest that we're excited to share the successes of today — regrowing celery from it's base.

We've figured out how to literally re-grow organic celery from the base of the bunch we bought from the store a couple weeks ago. I swear, we must have been living under a rock all these years or just not be that resourceful when it comes to food, but we're having more fun learning all these new little tips and tricks as we dive deeper into trying to grow more of our own food.

This project is almost as simple as the onion growing project — simply chop the celery stalks from the base of the celery you bought from the store and use as you normally would. In our case, we had a particular homemade bean dip that needed sampling!


Instead of tossing the base, rinse it off and place it in a small saucer or bowl of warm water on or near a sunny windowsill — base side down and cut stalks facing upright.


We let our celery base hang out in the saucer of water for right around one week, give or take. Over the course of the week, the surrounding stalks began to dry out significantly, but the tiny little yellow leaves from the center of the base began thickening, growing up and out from the center, and turned a dark green. The growth was slow, but steady and evident.


After the 5-7 days were complete, we transferred our celery base to a planter and covered it completely save for the leaf tips with a mixture of dirt and potting soil.


We watered it generously and after planting in the soil, the overall growth really took off. Not only do we have celery leaves regenerating themselves from the base, but you can see clear stalks making their way up and out. It's truly fascinating what we have not even a week after planting in the soil:


A few notes:
  • Change out the water every couple of days while in the "saucer" phase of the project. We also used a spray bottle to spray water directly onto the base of the celery where the leaves were growing out. 
  • The tutorials we saw showed planting the celery directly into the dirt outside — you may want to go this route if you live in a temperate area or want to be able to harvest outdoors. We went with an indoor planter since it's still pretty cold here in VA, we have limited outdoor space in the city, and the space we do have is currently unprotected from our curious puppy.
  • Continue to generously water the celery after planting to keep it thriving.
- + - + - + - + - + - + - + - + - + - + -

Update: After a few more weeks of growing time in our sunny window, our celery has continued to thrive. The leaves have grown out generously and bushy and the celery stalks underneath have really taken shape:


For anyone wondering about the planter, we made it by recycling a tin of steel cut oats we'd since finished. We simply cleaned it out well, then punctured holes along the base to create drainage for the plant.


We placed a thin layer of mulch at the base to help with drainage, followed by a thick layer of dirt/potting soil mixture. After placing the celery base snugly in the planter, we filled the remaining space with more dirt/potting soil to completely cover the celery base. We kept the top to the oats tin and flipped it over to place the new planter on top of it — the lid is a perfect custom fit to the base and catches any runoff from regular watering.

Wednesday, August 15, 2012

Gem Glass Corn

  from:http://www.savvyhousekeeping.com/category/gardening/

Glass Gem Corn

Filed under: Gardening — Savvy Housekeeper at 7:07 am on Monday, May 14, 2012

Check out this amazing Glass Gem Corn from Seed Trust. According to the site:
Seedsman Greg Schoen got the seed from Carl Barnes, a part-Cherokee man, now in his 80’s, in Oklahoma. He was Greg’s “corn-teacher”. Greg was in the process of moving last year and wanted someone else to store and protect some of his seeds. He left samples of several corn varieties, including glass gem. I grew out a small handful this past summer just to see. The rest, as they say is history. I got so excited, I posted a picture on Facebook. We have never seen anything like this. Unfortunately, we did not grow out enough to sell.
Two more pictures:


Does not look real, does it? Let’s hope there are seeds available for sale soon.

Friday, August 3, 2012

Basil - from the Savvy Housekeeper

 from: http://www.savvyhousekeeping.com/category/gardening/

10 Types of Basil

Filed under: Gardening — Savvy Housekeeper at 7:45 am on Wednesday, May 30, 2012

Basil is my favorite herb. I used to grow it in the window every year, but then I realized it does much better outside, so now I grow several plants every year, usually ending up with more than I can use. But no matter, it can easily be frozen in ice cubes:

I usually grow basil from seeds, but I’ve also bought starter plants from the nursery. This can be perplexing, as there are many types of basil out there. My favorite is the Italian Large Leaf basil, which has giant leaves and a sweet flavor that’s great in sauces. But there are many other types of basil, like Cinnamon Basil, which has a cinnamon flavor to it; or Mammoth Basil, which is big enough to roll food in; or Purple Basil, which is, well, purple.
The Herb Companion has an article on 10 Types of Basil, going over the most common kinds of basil. I’m interested to try Siam Queen, which is “the best of the Thai-type basils; licorice aroma and flavor are especially good in fish and beef dishes.”

Wednesday, August 1, 2012

Growing Pumpkins - from Mother Earth News

Pete's Pumpkin Patch

September/October 1985
http://www.motherearthnews.com/Nature-Community/1985-09-01/Grow-Pumpkins-For-Profit.aspx By Pete Johnson
095-042-01
Mother's Children
I have a booming pumpkin business. I grow pumpkins and sell them in the month of October. I started my venture three years ago in a 3,000-square-foot area, and now I'm planting one three times as big!
Every year my dad and I till up a field and dig holes where each plant hill is going to be. The hills are spaced anywhere from four to twelve feet apart, depending on the variety of pumpkin. We put a shovelful of cow manure in each hole (thanks to our local dairy farm). We also put in a few cups of organic fertilizer: cottonseed meal, lime, rock phosphate, ashes, and kelp meal. Then we mix it all together with soil.
After that I plant three or four seeds in each hill. After the pumpkins sprout, I transplant and thin as needed to make sure there are two or three plants in each hill. The young plants need a lot of water after being transplanted, so I really soak them. I also weed thoroughly.
A few weeks later the plants will probably need another watering. That takes a long time. My sister Danika weeds and waters with me. I pay her depending upon how much money I make. (This year she worked 20 hours and I paid her $25. Danika also grew gourds and sold them—she made $75 from her gourds!)
The next job with the pumpkins is mulching. My whole family helps with this job—all six of us. We spread spoiled hay under all the vines and in the open places to keep the ground moist and control weeds. The best thing to do after mulching on a hot afternoon is to go for a swim!
For the rest of the summer all I have to do is water the pumpkins and watch them get ripe. You can actually see them getting bigger and bigger every day!
This year I grew three varieties of pumpkins. The Spirit hybrid semibush variety produced nice, medium-sized pumpkins. I also grew some Connecticut Field pumpkins. They make big, orange, pretty pumpkins and are my favorite variety. And I grew some Small Sugars, a sweet pumpkin that weighs between three and seven pounds.
The selling of my pumpkins starts around October 8. I set up a stand that consists of hay bales and a little table made of sawhorses and a piece of plywood. I put 20 to 25 bales on the ground and then place my pumpkins on top of them and on the ground around them. I weigh the pumpkins on a baby scale and mark the price on each one with a black crayon. I sell them for 8¢ a pound. Next year I'm going to raise the price because they are the cheapest and best pumpkins in town!
Every year I place an ad in the local newspaper. It seems to bring many customers. Also, this year we made little signs to put in store windows. Two years ago my dad made me a sign to put by our driveway. It says Pete's Pumpkins, 8¢ a Pound. Many people just see the sign and drive in to take a look. They end up buying a few pumpkins, too. (When no one's at the stand, people serve themselves and put the money in a jar.)
Selling the pumpkins is really time-consuming. On a busy day I spend most of the afternoon by the stand helping customers. One day was so busy that I made $120!
My pumpkin financial arrangements work out like this. Each year I pay for seeds, gas for the tiller, organic fertilizer, advertising, and any labor that I hire. All that added up to $45 this year. My sales totaled $610, so I ended up with $565 net profit.
I have doubled my sales every year. The first year I made $150. The second year I made $300, and this year I made $610. My total earnings from all three years topped $1,000!
I have really enjoyed growing and selling pumpkins. I make more money than some kids who work a lot longer than I do. I also set my own hours. Besides, it's fun!
By the way, if you decide to start growing and selling pumpkins yourself, please don't do it too close to Whidbey Island, Washington. I don't need any competition!

Wednesday, July 25, 2012

Ways to Store Plastic Grocery Bags

 from: savvyhousekeeping.com

Four Ways To Store Plastic Grocery Bags

Filed under: Cleaning/Decorating — Savvy Housekeeper at 7:57 am on Wednesday, September 8, 2010
Even if you use reusable grocery bags, chances are that plastic grocery bags still make their way into your house. Since I reuse the bags I get, I usually stuff them in another plastic bag and shove them under the sink. The trouble is, the bags tend to fall out into the cupboard. So I took around for some better solutions. Here’s what I have so far:
savvyhousekeeping four ways to store reuse recycle plastic grocery bags bag
Real Simple suggests you store the plastic bags in an empty tissue box. I have tried this before and found it was annoying to put the bags in the box. But if you only reuse a few plastic bags, this might be a perfect solution for you.
savvyhousekeeping four ways to store reuse recycle plastic grocery bags bag
In a similar vein, NĂ e Chic recycled a disinfectant cloth containers by making it into a container for her “doggie poo bags.” But it could work for plastic grocery bags too.
savvyhousekeeping four ways to store reuse recycle plastic grocery bags bag
Woman’s Day informed me of this “easy-to-hang container has a self-adjusting divider and holds up to 50 grocery bags.” While I wouldn’t buy a special thing just to hold the grocery bags, but this would solve my plastic bag storing needs. Instead, I might keep my eye open for a flip-top garbage can at the thrift store.
savvyhousekeeping four ways to store reuse recycle plastic grocery bags bag
Finally, Make It and Love It has a tutorial for making your own grocery bag holder. You put new bags at the top and pull them from the bottom. It’s attractive too.
How to do store your plastic grocery bags?

Friday, June 29, 2012

Turn a Bar of Soap into Liquid Hand Soap

 from: savvyhousekeeping.com

Turn A Bar of Soap Into Liquid Hand Soap

Filed under: Money — Savvy Housekeeper at 7:33 am on Wednesday, February 23, 2011
savvyhouskeeping how to turn a bar of soap into liquid hand soap
I have a confession to make. I don’t like bar soap. It gets dirty and takes a long time to use up, so I usually get fed up with it and throw it in the trash.
Despite this, people seem to like to give me bar soap, which I feel guilty not using. So I have been buying liquid hand soap at $3 a bottle and putting the bar soap in a box with the intention of somehow finding a use for it.
Then it occurred to me that I might be able to convert the bar soap into liquid hand soap. Why didn’t I think of it before? I did some research and found out that it is easy to do. All it takes is melting the soap with water, adding a little vegetable glycerin, and voilĂ , you have made liquid hand soap.
savvyhouskeeping how to turn a bar of soap into liquid hand soap
So I tried it and was thrilled to find that it works great! From one bar of soap, I made close to 2 liters of hand soap, which will last a long time. The only thing I purchased for this project was a $2 bottle of glycerin at my local drug store:
savvyhouskeeping how to turn a bar of soap into liquid hand soap
Glycerin is made from plant oils and is commonly used in soaps, shampoos, moisturizers, etc. Since bar soap already has glycerin in it, I tried this experiment both ways, with and without the added glycerin. I found that the below recipe worked fine without the glycerin, except that the soap tended to clump and didn’t have as smooth a texture. It made enough of a difference that I would recommend adding the glycerin, but you can also try the recipe without it, if you wish.

How To Turn A Bar of Soap Into Liquid Hand Soap

Ingredients:
    1 c soap flakes
    10 c water
    1 Tbs glycerin

Equipment:

    Cheese grater
    A large pot
    Measuring cup and spoons
    A spatula for stirring
    A soap container with a hand pump
    A container to hold excess soap
    Funnel

Directions:

First, grate the soap. Get out your cheese grater, grab the soap, and get grating. I found this to be surprisingly easy, although the soap particles tend to float in the air as you grate. You can wear a mask to avoid breathing it in. When you’re done, the soap flakes look like grated Parmesan:
savvyhouskeeping how to turn a bar of soap into liquid hand soap
One bar of soap yielded a little over 1.5 cups of flakes. The recipe only uses one cup of soap flakes, so I put the remaining soap in a jar for later use.
In a large pot, combine 1 cup soap flakes, 10 cups water, and 1 Tbs glycerin. Turn on medium-low heat and stir until the soap dissolves. This happens fast, about a minute or two.
Let the soap cool completely, then pour into the containers using the funnel. That’s all there is to it!
savvyhouskeeping how to turn a bar of soap into liquid hand soap
As I mentioned, this recipe makes a lot of soap, about 6 bottles worth. I put the excess in a large bottle and am storing it under the sink. When I run out, I will simply pull out the big bottle and funnel some more into the smaller bottle.
You can also use this soap as body wash. To make it smell nice, add a drop or two of essential oil to the mix.
As I mentioned, the only thing I bought for this experiment was the glycerin. I reused the bottles and the soap was a gift. (Alternately, I could have saved soap slivers and made the hand soap that way.)
In the end, I used about $.40 worth of glycerin to make the equivalent of 6 bottles of hand soap. That’s a savings $17.60, well worth the half hour of my time it took to make the soap.
savvyhousekeeping dove soap liquid hand soap
UPDATE: I tried this with Dove Sensitive Skin Soap too. If you want to turn a bar of DOVE soap into liquid soap, click here for the recipe.

ETA: The kind of soap you use may be a bit of a wild card, since every soap will have different ingredients in it. I got the best results with a bar of Yardley soap, which did not even need the glycerin to become hand soap. In general, a higher quality soap will probably yield better liquid hand soap.
Dove Sensitive Skin Beauty Bar seems to be more difficult to turn into hand soap, which I would guess has something to do with the “sensitive” formula.
ETA II: I’m happy so many of you are finding this recipe helpful. If you are having trouble, such as thin or watery soap or “snot-like” (?) soap, I encourage you to read through the comments. Lots of people have reported back with their experiences with the recipe. It seems that sometimes letting the soap sit to thicken in the pot or hacking it with a hand blender to loosen it does the trick.
ETA III: For a solution on getting the soap to lather, try a foaming soap dispenser.