To be automatically notified when there are new postings to the blog please enter your email address below:

Wednesday, September 19, 2012

Make a Blanket Rack - from Mother Earth News

Mother's Blanket Rack

March/April 1980
http://www.motherearthnews.com/do-it-yourself/blanket-rack-zmaz80mazraw.aspx By the MOTHER EARTH NEWS editors
062 blanket rack
This blanket rack uses a diamond-and-a-half pattern, but the size and shape of the bottom scroll work and upper cutout are arbitrary.
PHOTO: MOTHER EARTH NEWS STAFF
Storage space for blankets—during the "in between" months when it can be cold one night and warm the next—can sometimes be hard to come by . . . especially when the shelves of many folks' bedroom closets are overflowing with the young'uns' toys, last season's clothing, or assorted containers that are "sure to come in handy someday".
Fortunately, MOTHER EARTH NEWS' researchers have designed a blanket rack that provides an easy solution to the problem . . . and one that won't crush the down in your comforter or crease the fabric of your favorite bed coverings. Better still, the holder's wooden rods can also be used for drying clothes, hanging towels (when you find yourself besieged by a lot of guests), or racking shoes (they rest against the bottom crossbars).
The attractive piece of furniture can be yours to enjoy . . . for only a few dollars' worth of wood and a couple of hours of your time. And this is one project you just about have to build yourself, because it's not the kind of item you'll find in the local department store at any cost.
MOTHER EARTH NEWS' workers built the handy device from spruce, but you can get almost the same results using white pine or fir. We cut a pair of 32" lengths of 1 x 12 for the rack's ends, and ripped five 1 1/4" x 1 1/4" boards from a 20" length of 2 x 8. (You could also use your ripsaw to divide three 20" 2 x 4's . . . which would leave you with one extra rod.) Our materials list was filled out with ten No. 12 x 1 1/2" flathead screws, ten 1/2" wooden cap buttons, and some glue and varnish.
As for tools, you'll need a ripsaw, a crosscut saw, a saber saw, a hand drill with a No. 12 adjustable countersink bit, a screwdriver, a paintbrush, and some sandpaper.
After cutting the 1 x 12's to length, you can determine the shape you'd like and cut both pieces with a saber saw . . . or you could, if you prefer, simply assemble the rack with unadorned rectangular sides. We decided on a diamond-and-a-half pattern.
The best way to come up with a pleasing end pattern that's symmetrical is to make a template by folding a sheet of wrapping paper—11" wide and 32" long—in half lengthwise. Draw one edge of your proposed end board ... cut both edges of the folded paper . . . open it up . . . and if you like the result (assuming the removal of the wood will leave room for attaching the five crossbars), trace the lines on one of the 1 x 12's and then cut the two of them at once.
We elected to place the centers of the two lower rods four inches above the floor line and six inches apart. The ends of the three upper pieces form the points of equilateral triangles with five-inch sides . . . the highest points being two inches below the end pieces' top edges.
We marked the two 1 x 12's and, using a No. 12 adjustable countersink tool, bored the holes for the crossbars. This drill/countersink tool not only creates the right-sized hole, but sinks it 3/16" . . . which is the depth you'll need later to install the 1/2" cap buttons.
Then we glued and secured — with No. 12 x 1 1/2" flathead screws — the ends of the rods to the inner faces of the two 1 x 12's. Note that the 1 1/4" faces of the lower crossmembers are parallel to the floor, while the three upper pieces are cocked 45° in an "edge high" position.
Next, we glued in the cap buttons and sanded all edges and surfaces. A couple of coats of satin urethane varnish (lightly sanded between applications) and voila: Our blanket rack was complete.
We think it's not only useful, but unusual enough to make an excellent gift.
Wednesday, September 5, 2012

Growing Celery Indoors - from 17 Apart


Growing Celery Indoors: Never Buy Celery Again


Remember when we tested and shared how to grow onions indefinitely last week? Well, at the same time, we've been testing out another little indoor gardening project first gleaned from Pinterest that we're excited to share the successes of today — regrowing celery from it's base.

We've figured out how to literally re-grow organic celery from the base of the bunch we bought from the store a couple weeks ago. I swear, we must have been living under a rock all these years or just not be that resourceful when it comes to food, but we're having more fun learning all these new little tips and tricks as we dive deeper into trying to grow more of our own food.

This project is almost as simple as the onion growing project — simply chop the celery stalks from the base of the celery you bought from the store and use as you normally would. In our case, we had a particular homemade bean dip that needed sampling!


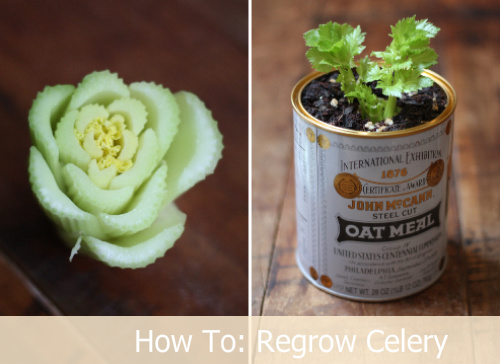
Instead of tossing the base, rinse it off and place it in a small saucer or bowl of warm water on or near a sunny windowsill — base side down and cut stalks facing upright.


We let our celery base hang out in the saucer of water for right around one week, give or take. Over the course of the week, the surrounding stalks began to dry out significantly, but the tiny little yellow leaves from the center of the base began thickening, growing up and out from the center, and turned a dark green. The growth was slow, but steady and evident.


After the 5-7 days were complete, we transferred our celery base to a planter and covered it completely save for the leaf tips with a mixture of dirt and potting soil.


We watered it generously and after planting in the soil, the overall growth really took off. Not only do we have celery leaves regenerating themselves from the base, but you can see clear stalks making their way up and out. It's truly fascinating what we have not even a week after planting in the soil:


A few notes:
  • Change out the water every couple of days while in the "saucer" phase of the project. We also used a spray bottle to spray water directly onto the base of the celery where the leaves were growing out. 
  • The tutorials we saw showed planting the celery directly into the dirt outside — you may want to go this route if you live in a temperate area or want to be able to harvest outdoors. We went with an indoor planter since it's still pretty cold here in VA, we have limited outdoor space in the city, and the space we do have is currently unprotected from our curious puppy.
  • Continue to generously water the celery after planting to keep it thriving.
- + - + - + - + - + - + - + - + - + - + -

Update: After a few more weeks of growing time in our sunny window, our celery has continued to thrive. The leaves have grown out generously and bushy and the celery stalks underneath have really taken shape:


For anyone wondering about the planter, we made it by recycling a tin of steel cut oats we'd since finished. We simply cleaned it out well, then punctured holes along the base to create drainage for the plant.


We placed a thin layer of mulch at the base to help with drainage, followed by a thick layer of dirt/potting soil mixture. After placing the celery base snugly in the planter, we filled the remaining space with more dirt/potting soil to completely cover the celery base. We kept the top to the oats tin and flipped it over to place the new planter on top of it — the lid is a perfect custom fit to the base and catches any runoff from regular watering.